Pro Vocal Chain: Achieve Commercial Vocals
You just recorded your vocals, and your take sounds as you wanted to. Now, you're questioning yourself "How do I mix those vocals so they sound commercial?". Let us help you there!
Here is the chain we'll be looking into:
Optional 1: FabFilter Pro G (Gate)
Optional 2: Izotope RX9 (De-clicking)
Optional 3: Auto-Tune (Tuning)
1. FabFilter Pro Q3 (Subtractive EQ)
2. FabFilter Pro DS (De-esser - compressing sibilances)
3. CLA-76 (Peak compression)
4. Maag EQ4 (Additive EQ)
5. Slate Digital Virtual Tape Machines (Tape Saturation)
6. LA-2A (Tube compression - Warmth)
Send 1: Valhalla VintageVerb - reverb
Send 2: Valhalla Delay - delay
Send 3: Sonnox Oxford Inflator - parallel upward processing
Achieving great vocals and those that sound commercial can be either a quick challenge or an absolute nightmare. Mixing vocals is the process where you have to dedicate a lot of listening and patience, so it's basically - art.
However, it doesn't always have to be frustrating and time-consuming. There are chains where pro engineers used an EQ with 3 filters (hpf, bell, high shelf), some compression and some saturation. But, that depends on the quality of the recording itself, so you have to have that into consideration.

Optional 1: Gate

Gating isn't always necessary. It depends on your recordings.
Usually before we start our chain, we tend to take care of background noises that could potentially be introduced in our recordings. This is not always the case since recording engineers usually take care of that with an external gate on their preamp. However, there are cases where we have to take care of that in mixing, so that's why we're beginning our chain with our gate.
Optional 2: De-clicking
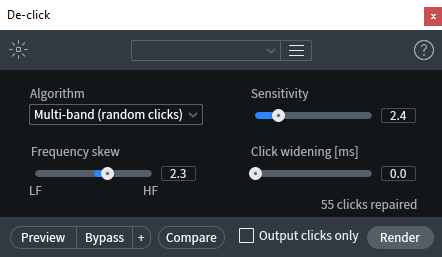
De-clicking is also an optional step, depending on your recording.
Optional 3: Tuning

We placed tuning in optional for a very good reason.
Insert 1: EQ (Subtractive)

FabFilter Pro Q3 - Our favorite subtractive EQ.
Insert 2: De-esser

De-esser is helping us to control the sibilance better before we use other processors later in our chain.
Insert 3: Compression (Peak)

Any 1176 emulation works in this example. We liked CLA-76.
You can also go with different approach to compression here! Try using a FabFilter Pro C2 with vocal algorithm, fast attack, faster release, and 5-6dB of gain reduction! That works great too! It depends on the vocals you're working with. Just make sure to turn lookahead on to avoid distortion. Also, oversampling (2x or 4x) come in handy.
Insert 4: Additive EQ

SSQ is one great FREE SSL EQ emulation that works wonderful as an additive EQ. Our advice is to absolutely try it!
Insert 5: Tape Saturation

Virtual Tape Machines by Slate Digital adds a very pleasant sounding harmonic distortion.
Insert 6: Compression (Tonal)

Slate Digital FG-MU, an insane plugin that not so many people use on vocals. However, we did! It's a hidden gem for sure!
Send 1: Reverb + Sidechaining

Valhalla VintageVerb is the reverb we wanted for this vocal.

FL Studio's stock compressor is the plugin we used to sidechain our reverb.
Send 2: Delay + Sidechaining

Valhalla Delay is the delay we wanted for this vocal.

FL Studio's stock compressor is the plugin we used to sidechain our delay.
Send 3: Upward processing

Using our EQ to isolate the mid range frequencies only.
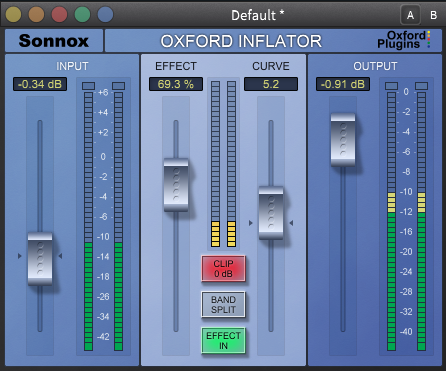
Sonnox Oxford Inflator - Legendary plugin.
Conclusion:
As you can see, there's a lot going on in this chain, but that's not always the case. As mentioned in the beginning, there are chains where engineers used only an EQ, compressor and slight saturation to get their vocals to where they wanted them. That highly depends on the quality of recording and outboard processing you have on your vocals while recording them.
Not a single chain will be the same, so have that in mind too! This chain was one example of how we personally process vocals and how a pro vocal chain looks like. Go against the rules in some cases, because that's how originality comes.
If you want to share your vocal chains with us, or you have some recommendations that you want to tell, feel free to reach to us on social media or via e-mail address provided on our site.
Learn more from our best-sellers!
-
Pro C2 Presets Pack
Original price $34.99Original price $34.99 - Original price $34.99Original price $34.99Current price $17.50$17.50 - $17.50Current price $17.50Presenting long-awaited "Pro C2 Presets Pack" - The Exceptional FabFilter Pro C2 presets to completely change the way you approach dynamics treatme...
View full detailsOriginal price $34.99Original price $34.99 - Original price $34.99Original price $34.99Current price $17.50$17.50 - $17.50Current price $17.50Save 50% -
Saturn 2 Presets Pack
Original price $34.99Original price $34.99 - Original price $34.99Original price $34.99Current price $17.50$17.50 - $17.50Current price $17.50Presenting "Saturn 2 Presets Pack" - The Mind-Blowing FabFilter Saturn 2 presets to completely change the way you approach saturation on your mixes...
View full detailsOriginal price $34.99Original price $34.99 - Original price $34.99Original price $34.99Current price $17.50$17.50 - $17.50Current price $17.50Save 50% -
Presets Bundle
Original price $140.00Original price $140.00 - Original price $140.00Original price $140.00Current price $64.99$64.99 - $64.99Current price $64.99This Bundle Deal includes: Pro C2 Preset PackSaturn 2 Preset PackPro MB Preset PackEQ Preset Pack
Original price $140.00Original price $140.00 - Original price $140.00Original price $140.00Current price $64.99$64.99 - $64.99Current price $64.99Save 54% -
EQ + Compression Bundle
Original price $199.99Original price $199.99 - Original price $199.99Original price $199.99Current price $125.00$125.00 - $125.00Current price $125.00This Bundle Deal includes: The Art Of Compression:260+ pages of detailed explanationsBeginner to ProGraphic illustrationsSecret techniques used by ...
View full detailsOriginal price $199.99Original price $199.99 - Original price $199.99Original price $199.99Current price $125.00$125.00 - $125.00Current price $125.00Save 37% -
EQ Masterclass
Original price $100.00 - Original price $100.00Original price$100.00$100.00 - $100.00Current price $100.00Beginner to Pro lessons Everything you don't understand about Equalization is explained through 5h+ long Masterclass split in 28 well edited video...
View full detailsOriginal price $100.00 - Original price $100.00Original price$100.00$100.00 - $100.00Current price $100.00


